

.png?cx=0.490000009536743&cy=0.540000021457672&cw=150&ch=120&blr=False&hash=D43FAB504FB280471AA49712C0861D78)


How to Get Perfectly Shaped Brows — and the Tools You Need

So you missed your last brow appointment. Don’t fret — neglecting your aesthetician doesn’t have to mean abandoning your brows. Properly shaped eyebrows can make you look more awake, so there’s no excuse not to groom. The secret to a perfectly shaped eyebrow can be summed up in 4 points:
-
The inner edge of your brow should line up with the outside of your nose.
-
The highest point of your arch should be where the diagonal line extending from the outside of your nose to the outside of your pupil would hit.
-
The outer edge of your brow should taper off at the point where your eyebrow and the diagonal line from your nose to the outside corner of your eye would intersect.
-
The bottom of the inner and outer edges of your brow should line up horizontally.
But before you get too comfortable in front of that magnifying mirror, we turned to LA-based freelance makeup artist Afton Williams to make sure you have all the proper tools to achieve amazing arches. These are the eyebrow tools you need in your kit.
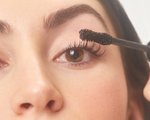
Spoolie brush: The spoolie brush is really the unsung hero of beauty tools. It’s a must for separating eyelashes and removing mascara clumps, and you can also use it on your brows to brush the hair up and away.
Small scissors: After you’ve brushed all the hairs in one direction, snip any ends that are noticeably longer than others. And always cut across the top of the brow, never down.
Brow pencil: Before you begin to tweeze, give yourself a guide. Fill in your brows with a brow pencil, and pluck away only the strays. One of our fave pencils is the Maybelline Total Temptation Eyebrow Definer Pencil.
Tweezers: The most important tool is, of course, a sharp pair of tweezers. Lancôme La Tweezer Précise will allow you to pluck with precision just like the pros.
To get a full grasp on how to shape and fill in your brows, we turned to Kayleigh Noelle’s brow shaping and filling in tutorial — watch the video below and follow the steps ahead to get the look.
Step 1: Kayleigh begins by brushing out her brows with a spoolie. She makes a note that she likes to brush the inner portions of her eyebrows up — and the outer portions of her eyebrows back.
Step 2: She then trims her brows straight across — so that the tip of the inner corner of the brow goes straight along with the rest of her eyebrow.
Step 3: Next, Kayleigh tweezes between and around her brows. She then goes in with a small eyebrow razor and shapes out her brows.
Step 4: Kayleigh then determines her eyebrow shape — by lining up the edge of her eyeshadow brush in different positions along her face — at three various angles.
Step 5: Kayleigh goes in with a lighter pencil at first to create the initial shape, starting from the inner corner and working her way out. She also works from underneath her brow and works toward the top of her brow, drawing out the end.
Step 6: Next, she goes in with an angled brush and pomade and fills in her entire brow. She then fills in the inner of her eyebrow with upward, tiny strokes.
Step 7: After finishing her brow, she goes in with concealer and strengthens the full shape. Finally she sets her brows with a clear brow gel.