


.png?cx=0.490000009536743&cy=0.540000021457672&cw=150&ch=120&blr=False&hash=D43FAB504FB280471AA49712C0861D78)


How to Blend Eyeshadow — According to Your Eye Shape

When it comes to perfectly applying eyeshadow, we can all agree that blending is the hardest part. While choosing the right shade for your eye color and choosing from the endless eye looks out there is hard, getting them to look right on you can be even more difficult. Luckily, blending isn’t as tricky as you think. It comes down to the right tools, technique, knowing your eye shape and like all things — lots of practice.
Keep reading for our tried and true tips for getting a perfectly blended eye every time.
TIP 1: Blend, Blend and Blend Some More
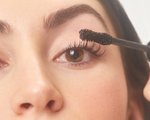
The first rule of blending eyeshadow is to do exactly that: blend, blend, blend! The reason for this particular tip is the more you blend your shadow, the more seamless it will look. A contouring eye shadow brush is best for this, as you can get a better blending effect by swirling the tip of the brush in a circular motion into the crease of the lid. Now there is such thing as over-blending — which can lead to a muddy look. The key is to blend enough so there are no harsh lines but not so much that the colors don’t feel like one gray-brown hue.
TIP 2: Transition Shades Are Key
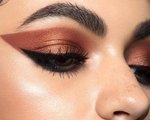
When applying shadows, it’s important to start by placing a transition color in your crease and building from there. This will stop your shadows from appearing harsh and will create that seamless, blended effect. Your transition shade is also an opportunity to define your crease, which gives your eyes shape and supports your overall eyeshadow look. When picking a color, choose a neutral, matte shadow that’s a few shades deeper than your skin tone. (Use your favorite contour shade as a guide.) Still need help find a color that’s right for you? Try the Urban Decay Ultimate Basics Palette, a 12-pan palette filled with must-have neutrals you’ll reach for time and time again.
TIP 3: Type and Texture
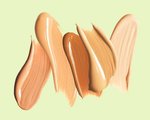
Eye shadows have many types of finishes and textures. From frosty and sparkly, to matte and cream, there are specific blending techniques for each. If your eye shadow has a frosty finish, limit it to the lid only, and blend with a flat shadow brush for more impact. If it's sparkly, blend in the crease only. For cream eyeshadow, you can be more liberal with the blending, especially if the hue is a natural one. Blend with your finger starting on the lid, all the way up the brow bone.
TIP 4: Know Your Eye Shape
Different eye shapes call for different blending techniques, so don’t despair if your fave beauty guru’s eyeshadow tutorial didn’t work for you. Almond shaped eyes may be able go crazy in their crease while people with hooded lids have to do a little more work to ensure their eyeshadow looks are visible when their eyes are open.
Need to see it in action? Watch our fave tutorials, ahead:
Large Lids
Beauty guru Laura Lee shows you exactly how to blend in this detailed eyeshadow tutorial. While she has plenty of lid space to work with and a well defined crease, her tips can be applied to almost every eye shape.
Hooded Eyes
For babes with hooded eyes, things get a little trickier. Your eyes tend to fold at the crease which can make blending a little more difficult. Luckily, this tutorial by Alissa Ashley has it all figured out:
Monolid
If you have a monolid, blending your shadow can take a little more finesse. While the basic technique is still the same, you don’t have a double crease as your guide. Watch this tutorial by Claire Marshall, where she creates a badass smoky eye you’ll want to rock on your next night out.
Photo: Courtesy of Maybelline for Laquan Smith