
.png?cx=0.490000009536743&cy=0.540000021457672&cw=150&ch=120&blr=False&hash=D43FAB504FB280471AA49712C0861D78)


This Rainbow Eyeliner Tutorial is Easier Than it Looks


As dedicated as we are to our everyday makeup routines, some days call for changing things up. Our winged liner can only make so many turns on our Insta feed before it’s time for a fresh beauty look. If the idea of veering away from your normal routine sounds intimidating, we get it. There’s nothing more stressful than attempting a new beauty trend without allotting for an emergency three hour gap between your makeup sesh and your real-life commitments. We reached out to beauty influencer and makeup artist Julia Salvia to help us come up with doable, abstract liner look that isn’t as intimidating as it sounds. Find out how she brought the look to life, ahead.
How to Get the Look, According to Julia:
Step 1
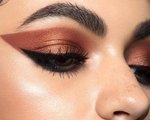
“For my eye look, the smoky eye was your classic black smoky eye. I figured that the colors would pop a more on black rather than no color.”

Step 2
“I used mainly the NYX Professional Makeup Vivid Brights Liners. To sponge the wing, I used a tweezer for precision and a makeup sponge (one of those basic triangular ones) and ripped it into tiny pieces.”

Step 3
“From there, I grabbed the sponge with the tweezer and dipped it in the liquid liner, which I put on the back of my hand. I repeated this for each of the four colors about three times for opaqueness.”

Step 4
“Then, I cleaned up the look with makeup remover to get the perfect wing.” Salvia also added a few dots of NYX Vivid Brights Liner in Vivid Sapphire under her wing for a complementary touch of color.

Step 5
Capture the look in all its glory.

Hero Image Courtesy Julia Salvia