


How Do You Apply Concealer Over Acne, Scabs, Scars, and Textured Skin?
September 17, 2026
Key Takeaways:
- Do not apply concealer to skin that is open, bleeding, or moist.
- Treat flat post-acne marks as a color concern and raised or indented scars as a texture concern.
- Match concealer to the surrounding skin when covering blemishes and scars.
- Apply product in thin layers and blend only the perimeter of the covered area.
- Use green, peach, or orange color corrector only when concealer does not sufficiently neutralize the discoloration.
- Set concealer selectively because excess powder can collect around flakes, bumps, and indentations.
Concealer is an essential in many makeup routines, celebrated for its ability to disguise dark circles, redness, and blemishes. While covering under-eye circles is fairly straightforward, camouflaging textured skin, old scars, or post-acne marks takes a bit more finesse. However, with the right approach, you can achieve a smoother, more even look and a welcome boost of confidence.
Read on for step-by-step tips to make concealer work for you—even over textured skin and imperfections.
What Can Concealer Do for Textured Skin?
Before you apply concealer, take a moment to identify whether the area you’re covering is mainly a color concern, a texture concern, or both. Color concerns—including redness, post-acne marks, and uneven pigmentation—can be significantly minimized with concealer or color corrector, helping the area blend more naturally with the surrounding skin.
Texture concerns, on the other hand—like flakes, scabs, raised blemishes, or indented scars—are more challenging. While concealer can’t physically flatten, smooth, or fill these areas, it can help camouflage these areas. It’s important to remember though that adding too much product may actually highlight texture, causing makeup to collect around dry edges or settle in indentations.
So, for the most natural-looking coverage, use the lightest application needed to reduce visible color contrast. While some texture may still be visible, the area will appear more even and blended overall.
| Skin Concern | What You Can Do | Concealer Option |
| Healing blemish | Hydrate, let the area dry, then press on one thin layer. Blend only the edges. | Maybelline New York Fit Me Concealer for lightweight, targeted coverage that matches the surrounding skin. |
| Active redness on a closed blemish | Apply a tiny amount of green corrector, then tap concealer over it without swiping. | Maybelline New York Instant Age Rewind Eraser Color Correcting Concealer offers buildable coverage over targeted discoloration. |
| Flat post-acne marks | Match the surrounding skin and apply concealer only to the discolored area. | Maybelline New York Fit Me Concealer for natural-looking coverage over redness and flat marks. |
| Indented or pitted scars | Use minimal concealer to even the color. Do not fill the indentation with product. | L’Oréal Paris True Match Radiant Serum Concealer offers lightweight, medium coverage and is formulated for a radiant finish. |
| Raised scars or textured bumps | Place concealer precisely over discoloration and diffuse the perimeter. Avoid layering over the highest point. | Maybelline New York Fit Me Concealer for precise coverage without starting with a heavy layer. |
| Dry-looking textured areas | Prep with lightweight hydration and avoid heavy powder or repeated touch-ups. | L’Oréal Paris True Match Radiant Serum Concealer when a lightweight, more hydrating and radiant formula is preferred. |
How Should You Prepare Textured Skin Before Applying Concealer?
Remember that skin preparation cannot remove acne scars or flatten raised texture, but it can help prevent concealer from catching on dry patches, separating, or gathering around uneven areas. Here’s how to prime your skin before application:
Start With Lightweight Hydration
- Apply a lightweight moisturizer to clean skin and allow it to absorb fully before adding makeup.
- Avoid scrubbing, peeling, or picking at flakes or a healing blemish—the skin should feel hydrated but not wet, greasy, or slippery (excess moisturizer can mix with primer or concealer and cause the makeup to separate or pill).
- Do not apply makeup directly to an area that is open, bleeding, or moist. Wait until the surface has closed.
Apply Primer Around Pronounced Texture
- Use primer to smooth the appearance of the surrounding skin rather than repeatedly rubbing it over a healing scab or raised blemish.
- One option: Maybelline New York Poreless Jelly Blur Primer, a silicone-free, non-comedogenic primer formulated with 2% niacinamide.
- Press a small amount around the area and allow it to dry before applying complexion makeup.
- Note: Primer may create a more even base for application, but it cannot physically fill deep pitted scars or flatten raised texture.
How Do You Apply Concealer Over Healing Acne, Closed Scabs, and Active Blemishes?
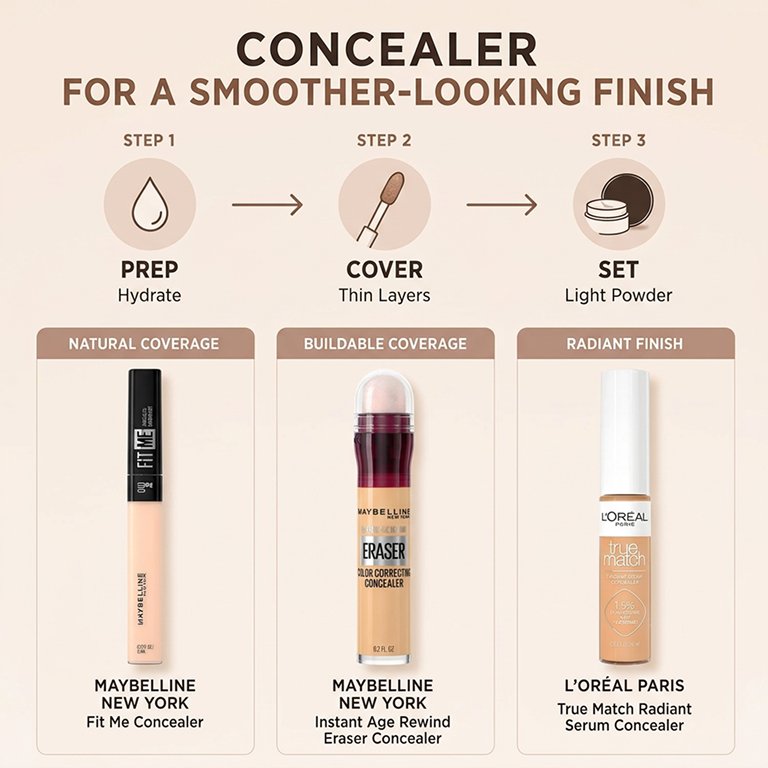
Important: Only apply makeup after the surface of the blemish or scab has fully closed. If the area is open, bleeding, or moist, leave it uncovered.
For a Dry or Flaking Healing Blemish:
- Apply a small amount of lightweight moisturizer without rubbing or lifting loose skin.
- Allow the moisturizer to absorb and the surface to dry.
- Choose a concealer that closely matches the surrounding complexion.
- Pick up a small amount with a clean precision brush.
- Press the concealer over the discoloration rather than swiping across the area.
- Blend only the outer edge so the center retains coverage.
- Let the layer settle before deciding whether more product is necessary.
Product Option: Maybelline New York Fit Me Concealer is an oil-free, fragrance-free, non-comedogenic concealer with medium coverage and a natural-looking finish. Its buildable format allows targeted application without beginning with a heavy layer.
For a Closed Blemish with Visible Redness:
- Begin with a skin-matched concealer.
- If redness remains visible, place a very small amount of green color corrector over the red area and keep it within the edges of the blemish.
- Allow the corrector to set, then tap concealer over it with a clean brush. Do not swipe, as dragging the applicator can move the corrector and reduce the neutralizing effect.
Product Option: Maybelline New York Instant Age Rewind Eraser Color Correcting Concealer offers buildable targeted coverage and is described by the brand as delivering up to 12 hours of wear. Tip—for a small blemish, use a separate precision brush rather than applying directly with the sponge-tip applicator.
How Do You Conceal Post-Acne Marks and Flat Scars?
Flat post-acne marks are primarily discoloration rather than surface texture, so they can usually be covered with a thin, targeted layer of concealer.
- Start with a concealer that matches the surrounding skin. Place it only over the mark.
- Tap to blend the edge without spreading the product across a larger area.
- If concealer alone does not sufficiently neutralize the discoloration, use a small amount of color corrector beneath it (keeping the corrector inside the post-acne mark):
- Green corrector can neutralize visible red tones.
- Peach corrector can help neutralize some blue or purple discoloration on lighter complexions.
- Orange corrector can help neutralize some blue, purple, or deep brown discoloration on deeper complexions.
Tip—extending color corrector beyond the discoloration may create a green, peach, or orange ring around the covered area. Because skin tone, undertone, and the color of a post-acne mark vary, begin with less corrector than you think you need and build only if the discoloration remains visible.
For Broader Areas of Uneven Tone:
Apply a thin layer of Maybelline New York Super Stay Lumi-Matte Foundation before spot-concealing. Its lightweight formula offers buildable medium-to-full coverage with a luminous matte finish, so you can even the surrounding complexion without starting with a heavy base. Keep the foundation layer light over pronounced texture, then add concealer only where discoloration remains visible.
How Do You Apply Concealer to Indented vs. Raised Scars?
Indented and raised acne scars require different application techniques, but the goal is the same: reduce discoloration without adding enough product to emphasize the change in surface level.
Indented or Pitted Acne Scars
Keep in mind that indented acne scars create depressions in the skin that naturally form light and shadow. While concealer may make discoloration inside the scar appear more consistent with the surrounding complexion, it cannot fill or flatten the indentation.
- Use a small precision brush to apply a minimal amount of concealer inside the discolored area.
- Blend around the edge rather than repeatedly pressing product into the depression. If you repeatedly press, a thick deposit may settle in the lowest point and make the indentation more noticeable.
Product Option: L’Oréal Paris True Match Radiant Serum Concealer offers lightweight, medium coverage and is formulated for a radiant finish. The non-comedogenic, fragrance-free formula contains 1.5% hyaluronic acid and caffeine. Tip—use a small amount so the radiant finish does not collect inside the scar.
Raised Scars, Bumps, and Textured Blemishes
Raised texture catches light at its highest point and creates a shadow around its perimeter. With that in mind, make sure not to add multiple layers of concealer, which may increase this contrast and make the shape more apparent.
- Place a skin-matched concealer only over visible discoloration.
- Tap gently and diffuse the outside edge without repeatedly blending across the highest point.
- If makeup begins to collect around the bump, remove the excess with a clean brush or sponge.
- Do not try to correct buildup by adding another layer.
How Do You Set Concealer Without Emphasizing Texture?
Not every covered blemish or scar needs setting powder. To determine if yours does, allow the concealer to settle and check whether it moves, transfers, or remains tacky. If setting is needed, follow the below steps:
- Pick up a very small amount of loose powder with a clean brush, puff, or sponge.
- Remove the excess from the applicator, then press the powder only where the concealer tends to move.
- Avoid sweeping powder across flaky skin or applying a thick layer over raised and indented texture. (Excess powder can cling to dry edges, collect around bumps, and settle into depressions).
Product Option: L’Oréal Paris Infallible Blur-fection Longwear Loose Setting Powder is a lightweight, talc-free formula designed to set makeup, control shine, and provide a blurring effect. It is also described by the brand as transfer-resistant and flashback-resistant.
Why Does Concealer Lift, Separate, or Look Cakey on a Scab?
Concealer may lift from a closed scab when the surface is too dry, skin care has not absorbed, makeup layers have not set, or the applicator repeatedly moves product across the area.
Common causes include:
- The area is too dry: Concealer catches on flakes or gathers around dry edges.
- There is too much moisturizer or primer: Wet or slippery layers can cause concealer to separate.
- Too much concealer was applied: Thick coverage creates visible buildup over uneven skin.
- The product was swiped instead of pressed: Dragging can lift concealer and color corrector from the center.
- Too much powder was used: Powder may cling to flakes and make the area look dry or cakey.
- The shade is too light: A bright concealer can draw attention to raised or uneven texture.
- Repeated touch-ups created buildup: Adding fresh product over separating makeup can make the texture more noticeable.
If the area becomes cakey, remove the excess with a clean precision brush or makeup sponge. Allow the surface to settle, then reapply one thin layer only where coverage is still needed.
Natural-Looking Coverage Starts with Realistic Expectations
For natural-looking coverage, focus on discoloration with thin, precise layers and allow some texture to remain visible. Give healing skin time, use lightweight preparation, and add coverage only where it creates a more even color match.
Concealer Comparison
| Product | Coverage | Finish/Formula Notes | Best For | Application Note |
| Maybelline New York Fit Me Concealer | Medium, buildable overage | Natural-looking; oil-free, fragrance-free, and non-comedogenic | Flat marks, healing blemishes, and precise spot coverage | Press on in thin layers and blend only the edges. |
| Maybelline New York Instant Age Rewind Eraser Color Correcting Concealer | Buildable, targeted correction | Color-correcting formula for visible discoloration | Closed blemishes with visible redness or color contrast | Use a precision brush for small blemishes, then tap concealer over top. |
| L’Oréal Paris True Match Radiant Serum Concealer | Medium coverage | Radiant; non-comedogenic and fragrance-free; contains 1.5% hyaluronic acid and caffeine | Indented scars and dry-looking textured areas. Provides hydration and a luminous effect. | Use sparingly so radiant coverage does not collect inside texture. |
Your Concealing and Texture Questions, Answered
Should you put concealer on an open pimple?
No. Never apply makeup to skin that is open, bleeding, or moist. Wait until the surface has fully closed, then use lightweight hydration and one thin, pressed layer of concealer.
What color concealer covers post-acne marks?
Start with a concealer that matches the surrounding skin. If discoloration still shows, layer a small amount of corrector underneath, green for redness, peach for blue or purple tones on lighter complexions, and orange for blue, purple, or deep brown tones on deeper complexions.
Can concealer fill in or flatten acne scars?
No. Concealer can even out the discoloration inside an indented or raised scar, but it cannot fill a depression or flatten raised texture. Thin, targeted layers reduce color contrast while leaving some texture visible.
Do you apply concealer before or after foundation?
Apply foundation first when covering broader uneven tone, then add concealer only where discoloration still shows. Spot concealing first can lift or smear when foundation is blended over it.
How do you keep concealer from looking cakey on textured skin?
Use the least product needed, press instead of swiping, and set only where the concealer moves or transfers. Excess layers and heavy powder are the two most common causes of cakiness over texture.
How do you remove concealer from healing skin at night?
Use a gentle, no-rub remover such as micellar water on a saturated pad, pressed over the area and swept lightly, then follow with your regular cleanser if needed.
Product selections are made using editorial research and brand knowledge; personal use or testimonials are noted where applicable.
Read more