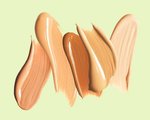
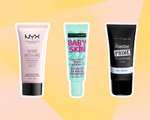
In a world where we choose our foundations and primers based on recommendations and what looks good on our fave celebs and influencers (or in a desperate last minute attempt at the drugstore), we rarely think about why two things go well together. We usually just accept that we look bomb and step out of the house. But it may be worth it to take a second look and consider what’s in your foundation. For starters, all foundation isn’t created equal, and we’re not just talking about the finish and coverage. Liquid foundations are either silicone, water or oil based — the latter being the rarest of the three. And you should choose different foundation ingredients depending on your skin type, skin care regimen and other makeup products. This will ensure your foundation doesn’t pill and your makeup looks flawless every time. Silicone-Based FoundationsIf your foundation is silicone-based, it will (usually) contain ingredients ending in -cone, -methicone and -siloxane as the second or third ingredient. The first ingredient will most likely be water, but that doesn’t mean the foundation is water-based. An example of a silicone based foundation is the cult-fave Maybelline Fit Me Matte & Poreless Foundation or the Giorgio Armani Luminous Silk Foundation. These foundations are great for mattifying and controlling shine — it’s like having a primer built into your foundation.Oil-Based FoundationsIn the case of oil-based foundations — which are pretty hard to come by these days — oil will be listed as the second or third ingredient. Even though they’re rare, they’re often loved by those with dry skin types. If you find that you have ultra-dry skin, opt for a moisturizing formula with oils and nourishing ingredients like hyaluronic acid. We recommend IT Cosmetics Your Skin But Better CC Cream, a full coverage formula that contains hydrolyzed collagen, hyaluronic acid and vitamins to nourish the skin.Water-Based FoundationsWater-based foundations will contain neither oil nor silicone at the top of their ingredient lists. Some water-based foundations may have silicones in them, but the quantity is so small that it isn’t worth mentioning. If you’re prone to breakouts, a water based foundation will be the most gentle for your skin. This is also a great option for dry skin because these formulas tend to be nourishing and packed with skin-loving ingredients to help maintain a moisturized look. Our favorite formula is NYX Professional Makeup Total Control Drop Foundation, a control-your-coverage formula that comes in 30 customizable shades.Pairing Primer With FoundationWhen picking a primer, you should pair like ingredients with like. Otherwise, you could experience separation, flaking or pilling after applying your foundation. Silicone based primers create a barrier between your skin and the foundation and when it comes into contact with a water-based or oil-based foundation, the result can be separation on your skin. A great way to test this is to place a small amount of primer on your hand and layer your foundation on top. If it turns powdery or starts to separate, then you know your products don’t play well together. This method, however, isn’t foolproof and doesn’t take into account your skin type and how it may respond to the combo actually being on your face. The only way to test that out is to see how it wears throughout the day.


.png?cx=0.490000009536743&cy=0.540000021457672&cw=150&ch=120&blr=False&hash=D43FAB504FB280471AA49712C0861D78)