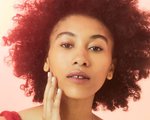
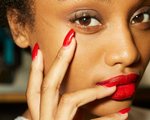
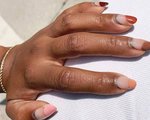
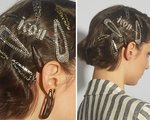
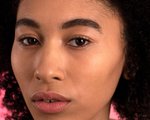
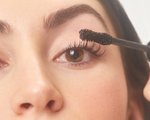
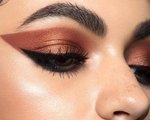
New York Fashion Week gives us a lot of gifts — one being the forecasts of next year’s fashion, but the second (and our favorite), the forecast of upcoming beauty and makeup trends. Ahead, we rounded up six superlatives that best describe the NYFW beauty trends we witnessed (and created!!) this year backstage, and we think you might just feel inspired by them too. The Nail Look That Makes You Want to Orbit Around Outer Space: Essie For Jeremy ScottDescribed as the “orbit nail,” this manicure at Jeremy Scott — designed by the one and only Miss Pop — certainly has us feelin’ some type of spacey way. We love how innovative this look is, yet it’s a nod to negative space nail art. “We took a striper brush and outlined the nail overtop a nude shade,” Miss Pop noted backstage. If you’re looking to recreate the look at home, she suggests that whatever your French tip length is, that’s how thick your orbit should be. Now, excuse us while we try this out and jet off to another planet.The Most Timeless Red Lip We’ve Ever Seen: Maybelline For CushnieFinding the perfect universal red is often a difficult task, but at the Cushnie SS19 show Maybelline’s Grace Lee was up for the challenge. Cue: The NEW! Maybelline Made For All Lipstick — a range where every color is designed to work for all skin tones. “I’m so excited for this lipstick to come out,” said Lee backstage. “And we chose to use this for the Cushnie show because she celebrates women, and the fact that she casted all ethnic background and varied skin toned models.” Lee noted that there are eight or nine shades in this new collection that have been tested on every single skin tone and shade, and perfected to suit everyone. “We’re using the red shade that has a balance of yellow, red and blue pigment that looks good on every skin tone,” said Lee. Seriously, the most timeless red lip we’ve ever seen — and we can’t wait to give it a try ourselves. The Nail Looks That Celebrate Who You Are, No Matter Who You Are: Essie For Opening CeremonyWe always admire how Opening Ceremony really brings creativity to NYFW, and this season was no different when it came to the incredible nail designs by Julie Kandalec for Essie. “Every nail look is different!” Kandalec noted backstage. “Depending on their individual personality, what we think that they would like and what they’re wearing.” Celebrating whatever each model prefers, their makeup and nails followed suit, whether they prefer tips, natural nails, no polish, tons of glitter or gingham. We can’t help but admire the boldness seen in this Spring 2019 nail trend, celebrating you and whatever you love.  The Bold Pout We’d Rock in Our Dizziest Day Dream: Maybelline For Alice + OliviaWhen it comes to a bold lip, we like it long lasting, powerful and vibrant. For Alice + Olivia SS19, Maybelline Global Artist Erin Parsons gave us just this. After applying one coat of the Superstay Matte Ink in Pioneer or Heroine, she let it dry and then intensified the color by applying a second layer in the center of the mouth to create a “super bright” effect — and that’s a head turner lip look we can’t wait to try.The Brow Routine We Want to Wear Every Day: Lancôme For Proenza SchoulerLancôme Global Makeup Artist Lisa Eldridge was certainly not messing around in creating her look for the Proenza Schouler, and we’re still reeling at the no makeup-makeup look she came up with. Eldridge’s muses this year sported a gorgeous bold brow that we seriously want to adapt into our makeup routine STAT, simply because the makeup really focussed on the brow hairs as opposed to the shape. “It was really like separating the brows, using a brow gel to create that long, separated look, rather than a blocky brow,” said Eldridge backstage — and we’re totally here for it, certainly sooner than Spring 2019.  The Hair That Makes Us Want to Live in a Wes Anderson Universe: Redken for Marc JacobsMarc Jacobs’s Spring 2019 show still has us reeling over his pastel colored collection, but it wasn’t just the fashion that drew us in — the matching hair colors absolutely did, too (in the best way). Redken colorist Josh Wood admitted that this was the largest color project he ever worked on, with 37 different girls. “Every single model had one or two fabric swatches that we color-coordinated with their hair, we layered a lot of colors,” he said. As for how they got the job done? “Every girl was bleached first with the new Redken Flash Lift with Bonder Inside, which protects the hair as we lift. They were then washed with Redken Color Extend Magnetics or Redken Color Extend Blondage depending on the desired result.” The actual coloring was done with Redken Shades EQ Pastels and Redken City Beats. Quite a hefty-color duty for Woods overall, but the Wes Anderson-esque finish was well worth the processes (literally).  Which NYFW Spring/Summer 2019 beauty look was your favorite? Sound off in the comments below.
.png?cx=0.490000009536743&cy=0.540000021457672&cw=150&ch=120&blr=False&hash=D43FAB504FB280471AA49712C0861D78)