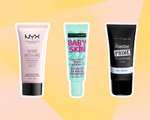
Sun damage is something we all need to be very careful of. It can cause sun spots, fine lines, wrinkles, or worse, so it is super important that we take all of the necessary precautions when it comes to avoiding sun damage.First off, wearing SPF every day is crucial. A lot of people don’t realize that it is still so important to wear an SPF each day to protect your skin. UV rays are still present in the winter or on cloudy days, so you still need to wear it then too! SPF is the best and most effective way you can protect your skin from the sun.Incorporating a foundation with SPF into your daily makeup routine is the easiest way to get in the habit of wearing it. Since you’re likely already wearing foundation every day, why not choose one that protects your skin from the sun’s harmful rays at the same time? It takes no extra time in the morning since you don’t have to apply an additional product and you’re doing a world of good for your skin.Luckily, IT Cosmetics has some incredible products that have SPF built into them, so you can get the sun protection you need without adding additional steps to your beauty routine! The Your Skin But Better CC+ Cream with SPF 50+ will protect your skin from the sun’s harmful rays while giving your skin a flawless finish at the same time! The full coverage foundation will hide any imperfections, so you can feel confident! The incredible formula is going to protect your skin from UVA and UVB rays too! And, it comes in a smaller size too if you’re looking for something more compact to travel with.If you’re looking for something a bit more luminous, check out the Your Skin But Better CC+ Illumination with SPF 50+! It is the same unbelievable formula as the original Your Skin But Better CC+ Cream, but this particular formula is also infused with proprietary Drops of Light Technology to give your complexion an added boost of radiance! You’ll get a healthy looking glow without all the glitter or shimmer. The finished result is a natural glow that really brightens up your complexion. Just like the original formula, you’re still getting that SPF protection with a flawless, full coverage finish too!And, if you prefer a powder foundation, they also have their Your Skin But Better CC+ Airbrush Perfecting Powder SPF 50+! The sheer to full coverage powder instantly transforms your skin by camouflaging imperfections while still providing your skin with powerful sun protection. The formula contains hydrolyzed silk, hydrolyzed collagen, niacin, and peptides to give your skin a flawless finish that won’t settle into lines or pores!To see these products in action just take a look at this video from @grwrady and you’ll see how flawless the result is!   @grwrady’s holy grail IT product is Bye Bye Under Eye! Keep watching to see her full IT-filled look! #itcosmeticsUne publication partagée par IT Cosmetics (@itcosmetics) le 18 Juin 2018 à 8 :26 PDTSun protection is key when it comes to younger looking skin. However, if you’re looking for other ways you can achieve younger looking skin, be sure to check out the IT Cosmetics website for 9 other tips!

.png?cx=0.490000009536743&cy=0.540000021457672&cw=150&ch=120&blr=False&hash=D43FAB504FB280471AA49712C0861D78)