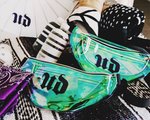
Over the course of our makeup-wearing years, we’ve tested nearly every makeup remover under the sun. For many years, we found comfort in the trusty makeup wipe and for others we resorted to a general cleanser that really made us work to get every drop of eye makeup off. But thanks to new technology, there are now products that literally melt the makeup off our faces. If you haven’t experience such magic let, let us do the honor of filling you in. A makeup melting cleanser can exist in the form of a balm, spray or oil. Once you apply it to your face, you’ll want to let it sit for anywhere from 30 seconds to a minute. During that short span of time, you’ll find that your makeup will quickly melt off your face — no aggressive removal required. Below, check out eight of our favorites — and figure out which one is right for you.Dermablend Makeup Dissolver, $23Dermablend is known for its face and body makeup that caters to every skin type, makeup wearer and skin concern — and their formulas are basically everything proof. One of the brand’s newest launches is the Makeup Dissolver, which is a fragrance-free, vegan product that’s ideal for all skin types, including sensitive and acne-prone skin. It makes their long-lasting makeup disappear in seconds. Urban Decay Meltdown Makeup Remover Dissolving Spray, $32Urban Decay Meltdown Makeup Remover Spray will remove the toughest, waterproof makeup products (yes, even including Urban Decay 24/7 Lip Pencils). Spray onto a cotton ball to target specific areas or spray into your hand and massage into your skin to remove your face makeup. The formula has a silky feel that might seem like oil, but it’s not! The vegan, oil-free formula contains only three ingredients — one being Vitamin E.IT Cosmetics Bye Bye Makeup Melting Balm, $48If you’ve heard of IT Cosmetics, chances are you’ve heard of this legendary makeup melting balm. In addition to melting the makeup right off of your face, it also acts as a hydrating, sulfate-free cleanser and an anti-aging, skin-softening serum. Plus, it has a faint citrus-y scent you’ll love.Palmer’s Cleansing Balm, $9.95If you’re one to search for drugstore gems, Palmer’s Cleansing Balm might be the perfect option for you. The formula transforms into a creamy facial cleanser when mixed with water, and its ingredients (raw coconut oil and monoi oil) will leave your skin feeling soft, hydrated and makeup-free.Banila Co Clean It Zero OriginalCleansing Balm, $19.79K-Beauty brand Banila Co is finally making its US debut on the brand’s new Amazon store. According to the brand, Clean It Zero Original Cleansing Balm is sold every three seconds globally (yep, it’s that good) and it even sold out within 10 days of its Amazon launch. The formula starts as a solid balm but transforms into a silky, oil-based texture as you massage it into your skin. With ingredients like Bamboo Extracts and other natural herbs, this cleansing balm will remove your thickest makeup and leave your skin feeling clean, hydrated and refreshed. Sahajan Essential Oil Cleanser, $48This Ayurvedic organic oil cleanser contains moringa oil, rose oil and coconut oil to remove makeup and impurities, as well as soothe and hydrate your skin. When you add warm water and massage the product into your skin, it melts your makeup away instantly.Pestle & Mortar Erase Balm Cleanser, $59Pestle & Mortar’s mission is to bring you products based on the mission to give you hydrated and healthy looking skin that are free from harsh chemicals and worrisome ingredients. This balm’s vegan, cruelty-free formula contains key ingredients like cold pressed meadowfoam, pumpkin enzymes and prickly pear seed oil to remove your makeup, cleanse your skin and provide nourishment.Shu Uemura Ultime8 Sublime Beauty Cleansing Oil, $99The steep price tag on this one might scare you, but it’s worth the splurge.This formula is made up of a blend of eight different oils, some of which are traditionally used in Chinese medicine. Users rave about its makeup-removing magic and the way it made their skin look better than ever before. Don’t believe us? Check out the comments.Read More:7 Easy Tricks That Make Big Pores Look SmallerBeauty Q&A: How Do I Use Self Tanner On My Face?6 Creative Ways to Keep Track of Your Lipstick Collection

.png?cx=0.490000009536743&cy=0.540000021457672&cw=150&ch=120&blr=False&hash=D43FAB504FB280471AA49712C0861D78)