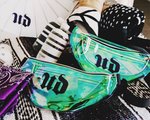
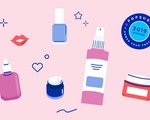
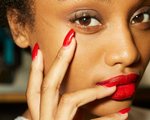
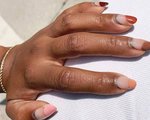
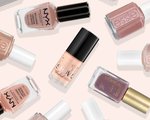
It’s a brand new month, which means a new round of products is making their way onto store shelves and into our makeup bags. These are the products Makeup.com’s editors can’t live without this January.Dawn, Editorial DirectorL’Oréal Paris Rouge Signature Matte InkI’m not a big fan of liquid lipstick — the formulas tend to be too thick and too drying for me, and they start to drive me crazy 10 minutes after I apply. However, this lip ink is something completely different. The formula is thin like a stain but still provides coverage, and it feels like nothing while lasting for hours. And the tube and applicator feel much more expensive than it is.Maybelline Tattoo Studio Brow PomadeThis pomade is perfect for a soft, natural brow look but still offers tons of color and a long-lasting result. It’s super easy to apply with a little angled brush, and the consistency makes it perfect for both novices and brow gurus to manage.  Lashify LashesLashify lashes live somewhere between falsies and lash extensions. They’re reusable lashes you apply yourself and can even wear overnight. I was impressed from my very first DIY application — and I’m no lash expert. If you want thicker lashes, these will be a game changer.  Nicole, Editorial Growth Strategist Maybelline SnapScaraThis mascara in Pitch Black is my new daily go-to — it defines my lashes, and I don't have to worry about getting raccoon eyes by the end of the day since it washes off super easily.NYX Professional Makeup Holographic Halo Cream EyelinerTechnically, I don't use this as an eyeliner — instead I rub a tiny amount of the shade Palisade Paradise between my fingers to warm up and pat on my eyelids for a pearlescent peachy gold wash of color that's perfect for every day.Laura Geller Illuminating Body MistWhen I'm going out at night and want any exposed skin to catch the light in my photos, I rub this on after I moisturize my body for a pretty yet subtle golden glow.Jessica, Creative Producer Lancôme L’Absolu Gloss in CapriceLately, I’ve been absolutely loving the color and the glossy finish of this lippie. It’s super pigmented and seems to last for hours with only a few reapplications, and it also keeps my lips feeling hydrated and smooth — not sticky!YSL La Laque Couture in Rouge Pop ArtIf you’re anything like me and you love a classic red nail polish color, this will become your new favorite. It’s a really creamy and pigmented red polish that can give you major color with just one coat, and I love wearing it during the colder season.Essie Gel Couture Top CoatWhen I choose to wear an Essie Gel Couture shade, this helps keep nail color from chipping after just one application which is a total lifesaver when it comes to keeping my manicure looking fresh throughout the week.Marisa, Assistant EditorUrban Decay On The Run Mini Palette in BailoutThis new mini palette just dropped from Urban Decay and Bailout is my new go-to. I'm loving this palette in particular because it has all the shades I need to go from a day to night look, whether that's a low-key look created in the gym locker room or a post-work outing with friends. I'm loving the combination of neutrals and pops of purple.Meow Meow Tweet Deodorant Paste in Tea TreeI'm not going to lie — the thought of using deodorant paste wasn't exciting, but I knew I had to test it in the name of beauty. I was worried that the natural, vegan formula wouldn't hold up throughout the day, but damn I was wrong. I've been using the Meow Meow Tweet Deodorant Paste in Tea Tree, and I rub it into my underarms with my fingers daily. Initially it's weird and obviously, quite a different experience from just rubbing a deodorant skin into your underarms. The result is so worth it, though. Trust me on this one — it really, really works. Fun fact: You can purchase a mini jar of it to test it out before buying the full-size. DO IT.Dr. Dennis Gross Extra Strength Daily Peel PackettesI've heard other editors rave about these daily peel packettes before, and clearly I'm late to the game. They have nearly five star reviews across the board and for good reason. I use them after cleansing and I wait two minutes in between step 1 and step 2. After using them, I hydrate my skin with a thick moisturizer. Since I started using them, I've noticed that my skin looks brighter, more hydrated and my skin tone looks more even. Alanna, Assistant EditorKayali Vanilla | 28 FragranceSweet scents are often not my favorite — which is why I surprised myself when I started wearing and excessively using this vanilla fragrance by Huda Beauty. It’s super fragrant and makes you smile with every spritz because it’s just totally warm and cozy. There’s also something quite nostalgic about this scent, reminding me of the warm vanilla sugar scents I would pile on in middle school but a whole lot more elevated.NYX Professional Makeup Candy Slick in Cherry ColaEveryone knows I’m a sucker for a dark lip, but a dark gloss? Even that kind of lippie makes me feel a little out of my comfort zone at times. That was certainly my feelings going into testing the new Candy Slick Glowy Lip colors by NYX, but I was pleasantly surprised and pleased. Cherry Cola has been my new favorite go to because it’s lightweight on the lips, non-sticky, vampy and leaves the softest stain. Insert heart eye emoji. Laneige Lip Sleeping MaskWhen its cold out, my dry skin crops up like Michael Jackson in the Thriller video — which is why I need major moisture overnight in every form. My lips are no different, which is why I’ve been loving the Lip Sleeping Mask by Laneige to give them a ton of hydration with minimal effort.  Tembe, Assistant EditorButtah Skin Facial Shea ButterWhen it comes to keeping my skin hydrated in the winter, I’m all about slathering myself in the thickest creams I can find. That’s until I found Buttah Facial Shea Butter, an easily spreadable alternative that keeps me moisturized all day long. It adds an undeniable glow to my skin, and makes my dead-of-winter selfies look like I’m fresh off a tropical vacation.Maybelline Made For All Lipstick in Red For YouRed lipstick is my go-to, so it’s safe to say I’m particular about the shade. I tend to go for true reds that skew a little blue-based and have an endless supply of slightly different shades. Maybelline’s Red For You is a welcome addition to my collection, a true red hue that somehow looks good (yet different) on everyone. The formula is comfortable and has just a hint of shine — the perfect combination for an everyday red lip. Alexandra Winbush Below 32 CandleFor me, good-smelling candles are a must, which is why this gem from Alexandra Winbush is a fixture on my faves list. It smells the way you’d want your room to smell the moment it drops below freezing (which also means I am no longer available for events that involve me leaving my bed), and smells like Vanilla Cardamom. It’s sweet yet warm and pairs perfectly with a long binge-watching session of my favorite beauty gurus.
.png?cx=0.490000009536743&cy=0.540000021457672&cw=150&ch=120&blr=False&hash=D43FAB504FB280471AA49712C0861D78)