


.jpg?cx=0.5&cy=0.5&cw=150&ch=120&blr=False&hash=27326E4FE66B0A2BFABAF4995DA29DC5)


Need a Distraction? This Graphic Lip Is Giving Us Serious Pop Art Vibes — Here’s How to Get the Look
April 01, 2020
-
STEP #1: Mattify the Lip
First things first, complete your complexion — you’re going to want to save the lips for last. After applying all of your foundation and concealer, reach for a setting powder, like the Dermablend Loose Setting Powder, and dust it around the border of your lips. This will mattify the area and make it easier for your lip liner to grip to the skin and not glide or skip during application.
-
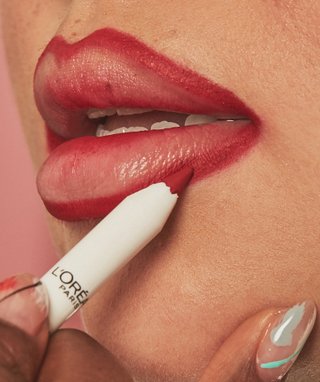
STEP #2: Pick Your Product
Once the area is prepped and ready to go, grab a long-wear lip liner. Williamson used the L’Oréal Paris Age Perfect Anti-Feathering Lip Liner in Flaming Carmin, a red shade. “It’s really creamy, so it’s super easy to apply and once it dries, it’s not going to move.” The no-tug formula makes this liner an obvious choice for over-lining the lips with ease.
![]()

-
STEP #3: Line the Lips
To give your lip liner a graphic vibe, over-lining the top lip is key. The pencil should fall on top of both the outer edge of your top lip and your skin. Work in smooth, slow strokes to get an even line. When lining your bottom pout, stay on your lip and off of your skin. Make a thinner line toward the center and layer on a little more thickness toward the edges. “It should go from thicker to thinner from the outer corners to the inside of the bottom lip,” says Williamson. “Also go a little over the lip line on the corner of your upper lip and connect the bottom lip liner on the actual lip.” She explains that this will allow the liner to look more precise.
-
STEP #4: Diffuse the Center of Your Pout
The lip liner outline is for sure cool on its own, but to up the ante, Williamson created a bitten lip aesthetic in the center of the pout. Using the L’Oréal Age Perfect Anti-Feather Lip Liner, she sketched little lines at the center of the lip. “Then, take a lip brush and blend it all out.” Add more product if needed to achieve the appearance of a diffused, almost comic book-like lip.
-
STEP #5: Finish Off With a Balm
Your graphic lip is almost complete. But, before showing off your pout, make sure to apply a semi-matte, clear lip balm, like the Kiehl’s Butterstick Lip Treatment With SPF 20. You don’t want a gloss to distract from the liner, but you also want your lips to look hydrated, soft and supple.
![]()
