


.jpg?cx=0.5&cy=0.5&cw=150&ch=120&blr=False&hash=27326E4FE66B0A2BFABAF4995DA29DC5)


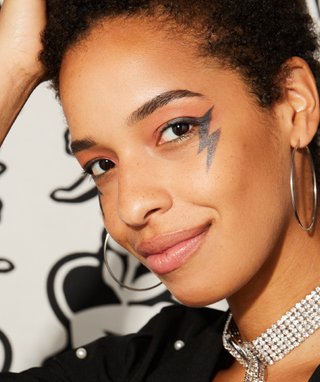
This Lightning Bolt Eyeliner Look Is Giving Us Rockstar Vibes — Here’s How to Get the Look
April 20, 2020
-
STEP #1: Pick Your Product
This lightning bolt look isn’t just a little wing — oh no. Expect this design to go down a fair portion of your cheek. To ensure that your liner glides on easily and stays put throughout the day, choosing a smudge-free and long-wearing liner is a must. Elaine’s choice? The IT Cosmetics Superhero No Tug Gel Eyeliner. “I love the texture because it’s super creamy and easy to use,” she says. “I also picked the shade Magical Slate (a metallic charcoal) because it’s much easier to fix your mistakes than a harsh black.”
![]()
-
STEP #2: Draw On Your Normal Eyeliner
First things first, you’re going to want to draw a normal winged eyeliner. “Start in the middle of the eyelid and work your way over,” says Elaine. “Go thin to thick as if you’re about to do a cat eye.” She explains that you’re going to want it to be on the thicker side and that you should make your cat eye straight out rather than upturned. “The eyeliner’s point should be almost at the end of your brow, past the arch.”
![]()


-
STEP #3: Sketch the Lightning Bolt
Next, sketch the outline of the lightning bolt to help you find the right shape. “You’re basically drawing sets of parallel lines from the tip of the wing line to make another point,” says Elaine. The inside line should extend slightly further than the outer line. Then, draw a second wing off of those two lines. The ledge of this wing should be just a smidge shorter than the first. Your third set of parallel lines should connect into a point. “The end of the lightning bolt should end around the flare of the nostril.”
![]()
-
STEP #4: Shade It In
Now that your lightning bolt is sketched out, it’s time to shade it in. Use your pencil to make small, straight lines from the top to bottom inside the lightning bolt outline. Try to keep your pressure uniform throughout.
![]()


-
STEP #5: Sharpen the Tips
A creamy pencil is great for sketching and shading, but your lightning bolt points may not be as sharp as you hope. Thankfully, there’s an easy fix. “I took the angled brush on the tip of the liner to get some excess product on it,” says Elaine. “I then made the points of the bolt really sharp.” If you're still looking to sharpen things up, feel free to use a dry, pointed Q-tip around the edges.
-
STEP #6: Finish Off the Eye
Once you’re rocking your lightning bolt liner, it’s time to finish off the rest of your eye makeup. Eyeshadow is totally unnecessary (let the liner shine on its own), but you’re going to want to do a quick swipe of a volumizing mascara and fill in your brows. Our go-to products? The L’Oréal Paris Bambi Eye Washable Mascara and the Maybelline New York Brow Fast Sculpt.
![]()
