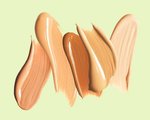
Sculpting and defining your face with a specific contour kit is reliable and all, but sometimes things don’t go so smoothly. In times of trouble, say, when you’re not at home and you don’t have your palette — or worse! — you hit pan on your go-to from Sephora, you need another option. In our humble opinion, an underrated makeup product with a really impressive ability to sculpt our face (fast) is concealer. Aside from the fact that concealer takes up a lot less space in your makeup bag than that massive palette, it also makes it so much easier to map out your face quickly — no brushes needed. To contour with concealer, you’ll just need a few products, starting with two shades of an easy-to-blend matte formula, like L'Oréal Infallible Pro Glow Concealer for a drugstore option or Urban Decay Naked Skin Complete Coverage Concealer for a more luxe one. You need one concealer that’s two shades lighter than your skin tone to highlight your features and one that’s two shades darker to define and sculpt. To complete the routine, you’ll need a damp beauty sponge. Instead of running to the sink every time you need to dampen your sponge, we recommend spraying your favorite face mist onto it instead.Below, check out the step-by-step instructions on how to successfully apply your contour using concealer.STEP 1: Contour Once your foundation routine is complete, use your darker concealer on your cheekbones and on the sides of your nose for definition and on your temples to sculpt. Depending on your specific face shape, you might want to adjust where you place the darker concealer. For example, if you have a diamond-shaped face, we recommend starting at your temples, but if you have a heart-shaped face, start at your forehead.  STEP 2: ConcealApply concealer under your eyes (in a triangle shape), along the bridge of your nose and wherever else you’d like some illumination. Use the darker contour lines to help guide your lighter concealer placement. STEP 3: BlendAfter your contour is mapped out, use a damp beauty sponge to blend, taking your time so that you’re left with a natural-looking finish. The result is a quick contour look that’s doable in the backseat of a car, your gym locker room or ten minutes before date night. And to see how it’s done in real life, check out this quick tutorial from Maryam Maquillage. Read More:5 Foundations That Have Matching Concealers —  And Why You Should Use Them TogetherHow to Use Concealer — Because You Might Be Applying It WrongA Guide to the Best Formula for Your Skin Type


.png?cx=0.490000009536743&cy=0.540000021457672&cw=150&ch=120&blr=False&hash=D43FAB504FB280471AA49712C0861D78)