


.jpg?cx=0.5&cy=0.5&cw=150&ch=120&blr=False&hash=13DE8EDEE0E1AF98CC5D704B05EC64EE)


This Double-Wing Eyeshadow Look Is Totally Doable (With a Stencil!)
October 07, 2019

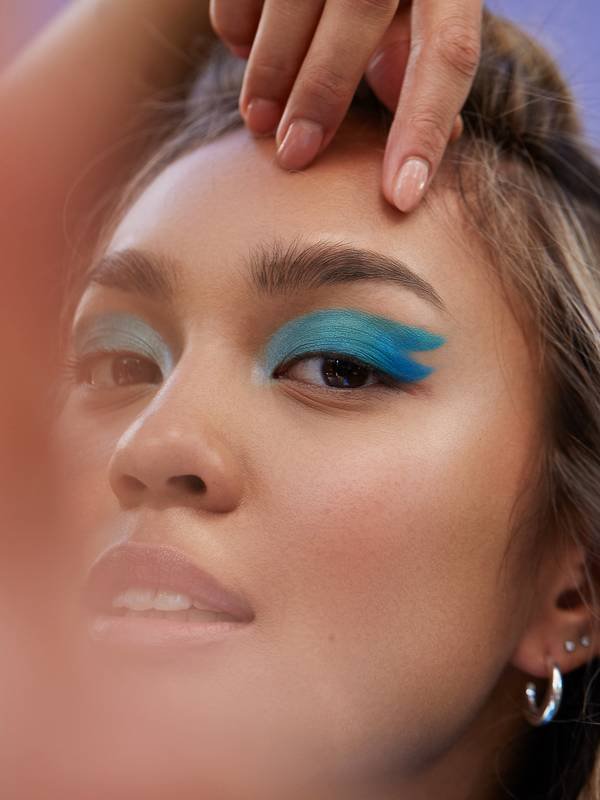
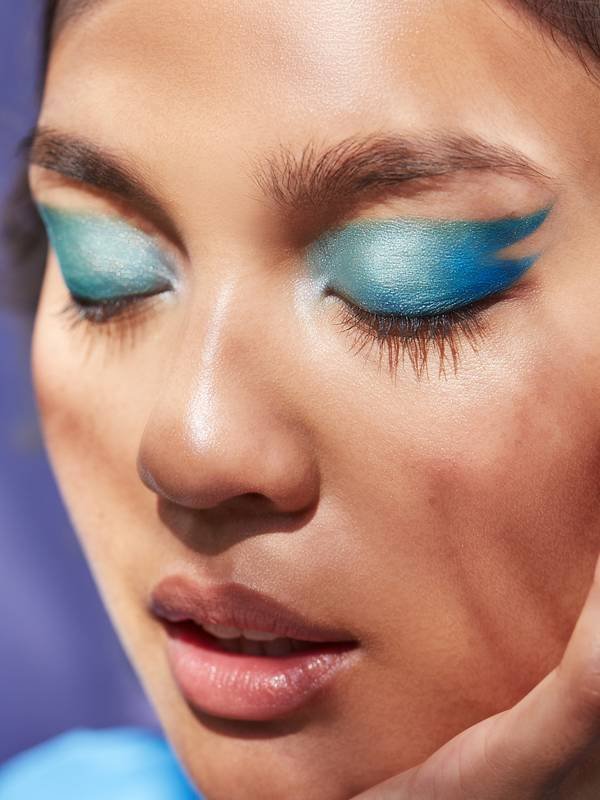
Using a stencil when applying your eye makeup can help create all different kinds of shapes on your lid space — from a hollowed-our cat eye to a liquid liner cut crease. When it comes to using a stencil with just eyeshadow, however, the possibilities are even more exciting. Not sure what we’re talking about? Ahead, we tapped NYC-based makeup artist Jonet Williamson to break it down. Read on for Williamson’s tips and see the incredible flaming blue stenciled eye makeup look she came up with.
STEP 1: Choose Your Colors
To start off the look, Williamson chose four different colors from the NYX Professional Makeup Modern Dreamer Palette. “For this look, you want to choose different colors in the same color family,” she says. “ We went for a light silver, aqua, a marine blue and teal green here.”
STEP 2: Apply Your Shades
Once you’ve chosen your colors, it’s time to build your look. “Start by applying the aqua shade all over the center of your lid,” says Williamson. “Follow that with silver in your inner corner, and swipe the teal green on the inner third of the lid and into the crease to build the base.”
STEP 3: Create Your Wings
Next, it’s time to create your wings with your stencil. Any eyeliner stencil with a sharp cat eye can work, but for this look, Williamson used the Beth Bender Beauty Stencil. Place the pointed, outward cat-eye edge on the outer corner of your eye (with the point facing inward) and blend together the teal and marine blue shades on both sides of the opened ‘V’ shape. “The ending of the shadow stops at the crease,” says Williamson. “Instead of blending it out or upward, keep the lines graphic.” Another pro tip is to only use the very edge of the stencil when applying shadow here. “Sometimes it’s hard to lay the stencil down flat, depending on your eye-shape, so use the corner of it as a guideline for placing your two wings.”
STEP 4: Clean Up
While Williamson advises actually wetting your makeup brushes with setting spray before applying the shadows to begin with (to give them a creamier texture), she also notes that cleaning them up after application is key. “Go in with a detail brush to thicken, curve or lengthen the wings as you please,” she says, “and you can go back with a little remover and a Q-tip to sharpen them up for a really precise look.”
Read More:
The Best Drugstore Eyeshadow Palettes Under $20
6 French Girl Red Lipsticks to Add to Your Stash ASAP