


.jpg?cx=0.5&cy=0.5&cw=150&ch=120&blr=False&hash=27326E4FE66B0A2BFABAF4995DA29DC5)


We’re Wearing This Halo Eyeliner to Every Zoom Party in the Foreseeable Future
May 18, 2020
-
STEP #1: Get Prepped and Ready
First things first, you’re going to want to complete your complexion — concealer included. Because this eyeliner look goes onto the under-eye area, make sure your concealer is perfect, and most importantly, set and dry. We recommend using the Dermablend Loose Setting Powder to ensure your concealer stays put.
Next up? Select your eyeliners. Choose no-tug, smudge-proof cream eyeliners like the NYX Professional Makeup Vivid Brights Cremé Color or the Suva Beauty Hydra FX eyeliners. While San Vicente-Landestoy opted for two contrasting colors, feel free to keep your look monochromatic.
![]()
-
STEP #2: Start With a Semi-Circle
Grab a very thin detail brush and coat it with your desired eyeliner shade (San Vicente-Landestoy went with Rebellious Edge, a vivid violet). Start applying the product in a very thin line by your brow bone, just above your crease and below the brow. Start at your inner corner. “The trick to doing this is to not overthink it,” says San Vicente-Landestoy. “Don’t worry about the thickness to start — you can always go back and make it bolder. Just get the shape down.” (Pro tip: If you want a guide before applying color, trace the area with a white eyeliner.)
![]()


-
STEP #3: Curve it Around
Once you’ve lined the upper half of your eye, extend the liner upwards just a tad before curving it downward. You want the upper edge of the halo to end just before the tail of your eyebrow. “After you begin to curve the line downward, you’ll continue to draw a line under the eye,” says San Vicente-Landestoy. “It feels a bit unnatural, so I recommend rounding it out in small dashes and giving the liner plenty of time to dry.”
![]()
-
STEP #4: Perfect the Shape
Connect the bottom semi-circle at the inner corner of the eye. Take a step back and evaluate the shape. If you find that certain spots need to come down lower or go up higher, mark it with your brush. “Then just go back in with more eyeliner to thicken the halo for a really bold and opaque look,” says San Vicente-Landestoy.
![]()


-
STEP #5: Repeat on the Other Side
Now that one eye is complete, repeat the process on the other eye. SanVincent-Landestory swapped out her purple shade for a bright orange, like the NYX Professional Makeup Vivid Brights Cremé Color in Cyberpop. Don’t worry about making your eyeliner perfectly symmetrical. It’s a graphic, offbeat look — have fun with it!
![]()
-
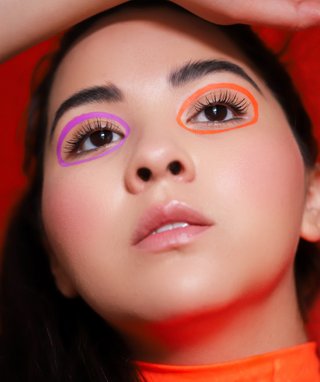
STEP #6: Finish Off Your Eye Makeup
Your graphic eyeliner is good to go! All that’s left is to swipe on some mascara, fill in your brows and add a bit of highlighter. Keep your lips a neutral color and play it on the softer side with blush and bronzer. “As soon as I put my brow on and coated my lashes with the Maybelline New York Volum’ Express The Falsies Mascara, I felt like this was a whole lewk on its own,” says San Vicente-Landestoy.
![]()

