


.jpg?cx=0.5&cy=0.5&cw=150&ch=120&blr=False&hash=27326E4FE66B0A2BFABAF4995DA29DC5)


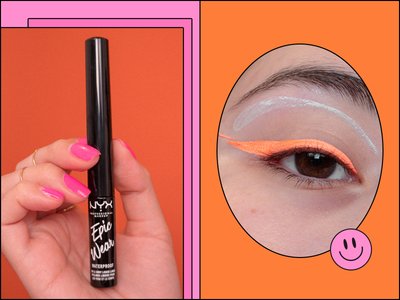
This Stacked Neon Eyeliner Is the Ultimate Ode to Summer
August 19, 2020

-
STEP 1: Use a White Pencil to Outline the Look
Creating graphic eyeliner looks can be intimidating because of the precision. To help create the precise lines, San Vicente-Landestoy outlined the look using the NYX Professional Makeup Faux Whites Eyeliner Pencil. This creates a guide before going in with liquid eyeliner, and it also helps the colors stand out more. First, she outlined the wing without filling it in and then, she created the stacked top eyeliner. To do so, she created a long teardrop shape following along her brow. She started tracing all the way from the outer corner of her brow to the inner corner of her eye and then traced back along that same line. Note that the teardrop gets thicker towards the end of the brow.
![]()
-
STEP 2: Fill in Your Winged Eyeliner
Using the Suva Beauty Neon Eyeliner in Acid Drip, which is a gorgeous neon orange, she filled in her winged eyeliner.
![]()

-
STEP 3: Fill in the Stacked Eyeliner
Next, San Vicente-Landestoy filled in the top eyeliner and created a gradient. She started on the outer part of the eyeliner using the NYX Professional Makeup Epic Wear Eyeliner in Lilac and stopped midway through. Then, she used the NYX Professional Makeup Vivid Brights Eyeliner in Vivid Petal to fill in the inner corner. To create that gradient effect, San Vicente-Landestoy used Vivid Petal to create tiny strokes where the pink and purple eyeliners meet to avoid a harsh stop.
![]()
-
STEP 4: *Optional* Add Rhinestones
While the original inspiration didn’t have rhinestones, San Vicente-Landestoy added six self-adhesive pink rhinestones right beneath the stacked top eyeliner, and we are here for it. The trick to applying these stones is to make sure you’re looking at yourself straight on with your eyes open so that you don’t experience any issues opening and closing your eyes, she says.
![]()


-
STEP 5: Finish With Mascara
Finally, finish the look using your favorite mascara. For this look, San Vincente-Landestoy used the Urban Decay Lash Freak Volumizing Mascara, which comes with an asymmetrical brush to coat every eyelash with the maximum amount of formula for extreme volume and definition.
![]()
-
