


.jpg?cx=0.5&cy=0.5&cw=150&ch=120&blr=False&hash=27326E4FE66B0A2BFABAF4995DA29DC5)


How to Do a Tetris Eye Makeup Look, According to a Beauty Editor With Zero Professional Makeup Skills
August 18, 2020

-
STEP 1: Prep Your Eyes
Because there’s a lot going on with this look already, I decided to keep my eyelids completely bare and skip the eyeshadow primer. Instead, I prepped my lids by sweeping some translucent powder to absorb any oils that could make applying the eyeliner difficult.
-
STEP 2: Create Your First Triangle
The easiest way to approach this makeup look is to take it shape by shape and divide the eyelid into four parts — the center, the inner corner, the outer corner and the lower lash line. Using the NYX Professional Makeup Vivid Brights Eyeliner in Vivid Fire, I created the first red triangle in the center of my eyelids to act as a guide for where the other shapes would be placed.
-
STEP 3: Fill in the Inner Corner
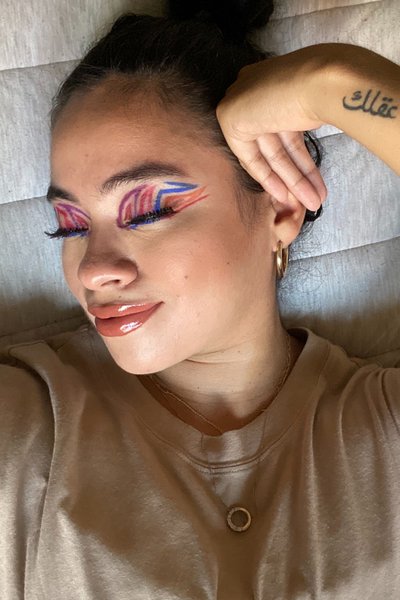
After creating the center triangle, I filled in the inner corner, which consists of two crescent shapes, one inside of the other. First, I created the larger crescent shape starting from the lower lash line and hugging around the inner tear duct to create a half-moon shape up to the brow and brought it back down, finishing right next to the first center triangle. In Burlacu’s original look, this shape is green but I decided to use the NYX Professional Makeup Vivid Brights Eyeliner in Vivid Blossom because I love the color purple. And while the color is beautiful, the lilac hue was a little light on my medium complexion, so to emphasize it, I went traced over it with the Pixi Beauty Endless Silky Eye Pen in Very Berry. That’s the fun part about this look, you can choose whatever colors fit you best.
After I created the first crescent, I mimicked the same exact shape inside of the original using the same red Vivid Fire eyeliner I used for the first triangle.![tetris-eyes-makeup]()
-
STEP 4: Finish the Outer Corner
I finished the upper eyelid by creating the final three shapes on the outer portion of the eye. First, I created an elongated triangle starting right at the end of my eye and dragging it out towards the temple. For this shape I used the NYX Professional Makeup Vivid Brights Eyeliner in Vivid Delight, a bright orange. Within that triangle, I used the purple eyeliner from before to create an upside down “L” shape. In between the orange triangle and the first center triangle, I created a bigger upside down “L” shape using the NYX Professional Makeup Vivid Brights Eyeliner in Vivid Sapphire. The only difference for this step is that I added an additional line connecting from the end of the “L” to create an unfinished triangle near the brows, exactly like Burlacu.
-
STEP 5: Do the Lower Lash Line
Finally, I finished up the bottom lash line by connecting the purple crescent shape that ended at the lower lash line to the blue eyeliner. I dragged the blue eyeliner across most of my eye and then filled in the rest with the red liner, dragging it out to create a bottom winged eyeliner look.
-
