How to Create Kintsugi Nail Art Designs, According to a Nail Artist
June 28, 2022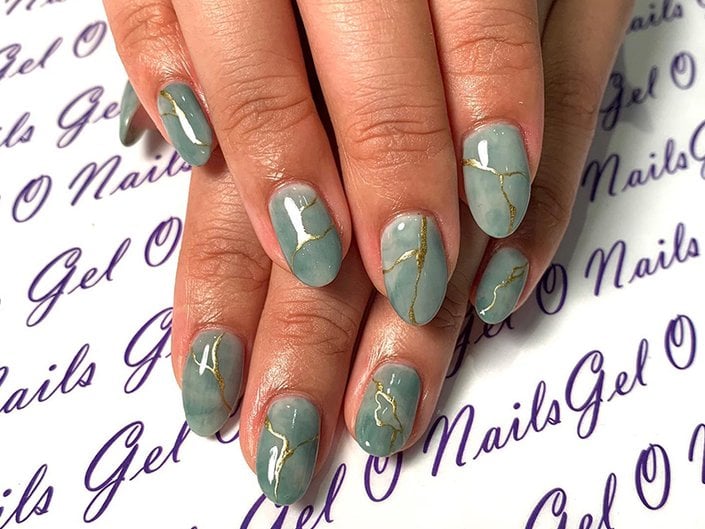
What Do I Need for a Kintsugi Manicure?
In addition to the usual suspects for a DIY manicure — you know, a base coat, nail color, top coat, and tools to shape and buff your nails — Remark notes you’ll need a metallic nail color like Essie Penny Talk, No Place Like Chrome, or Good As Gold and a fine-tipped detailing brush.
How to Create Kintsugi Nail Art
1. Prep Your Nails
Begin by using a nail file to create your desired shape, then buff each nail to impart a smooth surface. Follow by pushing your cuticles down, then layer on your favorite base coat. We love Essie Here to Stay Base Coat.
2. Apply a Base Color
Because the focus is on the metallic Kintsugi details, you can feel free to choose any color as your base. “You can also choose to have the base be a marbled or geode design if you prefer,” says Remark. Against neutral tones like Essie Chinchilly, Blanc, Licorice, or Toned Down, the metallic design will really pop, but the effect is just as stunning over bright tones, like Life’s a Beach, a bold turquoise.
3. Create Kintsugi Designs
Dip your fine-tipped brush into your metallic lacquer, and start painting on small, irregular lines across each nail, varying the design as you go. “Let the lines intersect and allow them to widen and thin naturally like a bolt of lightning,” says Remark.
4. Apply Top Coat
Once all the metallic details have been added to each nail, seal in your work with a layer of top coat. We’re obsessed with the Essie Gel Couture Top Coat which creates a gel-like finish that can last up to 14 days.
Photo Credit: IG/@gelonails











.jpg?cx=0.5&cy=0.5&cw=150&ch=120&blr=False&hash=27326E4FE66B0A2BFABAF4995DA29DC5)

