How to DIY the Viral Airbrush Manicure Trend 

April 19, 2023
Reece Andavolgyi
By: Reece Andavolgyi | Makeup.com by L'Oréal
reece's starry airbrush nail art collaged onto an iphone frame and pink and orange background with star graphics

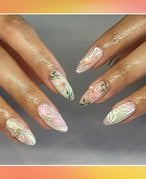
If you're as obsessed with nail art as I am, you've definitely seen airbrush nail art on your social media feeds. Usually on a milky base with diffused, gradient colors, cut-out shapes and aura designs, the trend is a great way to play with color and delivers a one-of-a-kind mani. 


TikTok has taken this trend to the next level, and creators have shared helpful tutorials and info on ways to DIY the look — no airbrush equipment required. As demonstrated by TikTok creator, @simlynail, an eyeshadow palette and a blending brush can be used to create a colorful ombré design. In another video, TikToker creator, @heygreatnails, used eyeshadow and nail stickers to create an easy airbrush stencil look. 


I’ve attempted DIY nail art in the past, and the one thing that always deters me from trying out new nail trends at home is how long it takes. That said, this DIY looked quick and relatively simple (and required products I already had in my makeup drawer!), so I knew I had to try it out.

How to DIY Airbrush Nails

Following along with @heygreatnails’ airbrush nail tutorial, I started off my manicure by applying a base coat and a milky, nude nail polish, like the Essie Gel Couture Longwear Nail Polish in Oh Corset. After letting the polish dry to about 80% (this is important because the polish needs to be slightly tacky for the eyeshadow to stick), I used tweezers to apply my nail stickers to each nail. The nail stickers work like stencils and create the outlined shapes on your nails. I opted for stars, but shapes like butterflies or hearts can also work.
reece applying the nail stickers onto her nail with a tweezer

Keeping the tutorial in mind,  I reached for a colorful eyeshadow palette. If you have any old (dare I say, expired) eyeshadow in the back of your makeup drawer, this is the perfect use for it. I swirled my clean eyeshadow brush into a light peach shadow and gently dusted it on my pinkie nail, focusing on the area surrounding the nail sticker. When I removed the sticker with tweezers to see how the design looked, the star outline was very soft-looking and hardly noticeable.


I finished by applying a layer of the Essie Gel Couture Top Coat to give my nail art a gel-like shine. From start to finish, the whole look took less than an hour, and I’m so happy with the results. 

reece applying the pink eyeshadow over her nails
reece pulling off the nail star sticker to reveal the airbrush nail art

I finished by applying a layer of the Essie Gel Couture Top Coat to give my nail art a gel-like shine. From start to finish, the whole look took less than an hour, and I’m so happy with the results. 


It’s worth mentioning that you don’t need expert skills to master this DIY — I was able to do it with my non-dominant hand without any issues. Overall, I definitely recommend this DIY nail art trend, and I can’t wait to try it with a different color combination. 

reece showing off her diy airbrush stencil nail art!
Photographer: Reece Andavolgyi Design: Juliana Campisi

Read more

Loading
Back to top