.jpg?cx=0.5&cy=0.5&cw=150&ch=120&blr=False&hash=27326E4FE66B0A2BFABAF4995DA29DC5)


NAIL ART
Whether you’re DIYing your mani or heading to the salon for a new set of acrylic tips, get inspired with these nail art designs and trends.


Recommended Articles
-
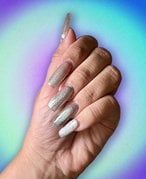
![Photo of long silver velvet nails collaged on a blue and green background]() Nail Art24 Gorgeous Velvet Nail Ideas to Try This Holiday Season12/15/2023
Nail Art24 Gorgeous Velvet Nail Ideas to Try This Holiday Season12/15/2023 -
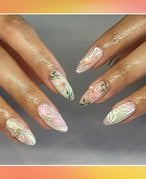
![Image of fairycore nails on a graphic background]() Nail ArtChannel Your Inner Fairy With Fairycore Nail Art12/13/2023
Nail ArtChannel Your Inner Fairy With Fairycore Nail Art12/13/2023 -
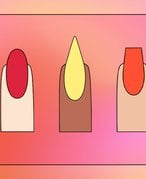
![illustration of fingers with painted nails in various nail shapes, on a pink and orange graphic background]() All NailsYour Guide to 10 Nail Shapes, From Almond to Square11/15/2023
All NailsYour Guide to 10 Nail Shapes, From Almond to Square11/15/2023 -
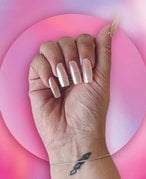
![Picture of an editor with neutral chrome nails on a pink graphic gradient background]() Nail ArtHow to Do a Chrome Manicure, With or Without Gel Polish11/8/2023
Nail ArtHow to Do a Chrome Manicure, With or Without Gel Polish11/8/2023 -
![Close-up picture of denim nails on a blue gradient graphic background]() Nail ArtDenim Nails Are the Minimalist Manicure of the Moment10/12/2023
Nail ArtDenim Nails Are the Minimalist Manicure of the Moment10/12/2023 -
![A box of press-on nails and nail glue on a blue and pink background]() Nail ArtHow to Avoid Air Bubbles When Applying Press-on Nails10/6/2023
Nail ArtHow to Avoid Air Bubbles When Applying Press-on Nails10/6/2023